Logic for Pro Tools users Part 5: Aux tracks and busses March 5, 2008
Posted by ConnorSmith in : Digital Audio Workstations, Logic Studio 8, Pro Tools , trackbackOne aspect of digital audio that Logic Pro handles differently than any other DAW is routing tracks through busses and aux tracks. In most other DAWs (including Pro Tools LE), busses exist separate from auxilliary (or Aux) tracks. Also, in other DAWs, a “bus” is typically mono (so “Bus 1″ is mono, and if you wanted stereo, you’d select “Bus 1-2″. In Logic Studio, these things are handled a little bit differently. Remember though, no matter what DAW you are in, a “bus” and an “aux” are two very different things. I like to think of a bus as an imaginary placeholder, where you can send audio. An Aux track is a special track made to access and affect the audio assigned to those buses. Aux tracks have many other uses besides bus routing. For example, if you want to record a track with a digital effect printed on it, you can use an Aux track as your input (with the plug-in effect active) and then route the audio from the Aux track to its audio track (through the use of a bus). Anyway, back to explaining these concepts in Logic:
Let’s look at track creation in Pro Tools. When you select to make a new track, you can make audio tracks, aux tracks (or “input” as PT calls it), instrument tracks, MIDI, etc… So, no matter what you are using the aux track for, you can make as many as you want from here (and then assign their function, inputs, and outputs later).
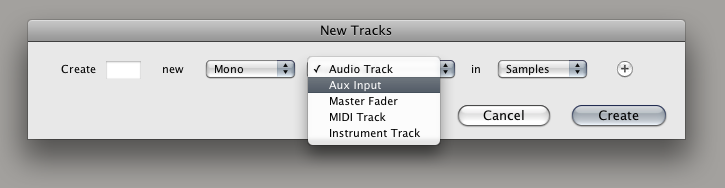
In Logic Studio 8, things are different. To a certain extent, Apple tried to simplify things by blurring the difference between an aux track and a bus (although in the end, it seems as though its actually a little more confusing) If you look in the “Create New Track” dialog box, you will notice that creation of an Aux track is not an option. To create Aux tracks, you have to either route a track’s send or output to a bus. EDIT: You can also make a new Aux track by clicking Options>Create New Aux Channel Strip in the Mixer window, or by clicking the “+” button on the far left hand side of the mixer. When you do that, Logic will automatically create a new aux track with that bus as its input (on the RH side of the mixer). Notice below, I assigned a track’s output to bus 2, and Logic automatically created a new Aux track with an input of bus 2.
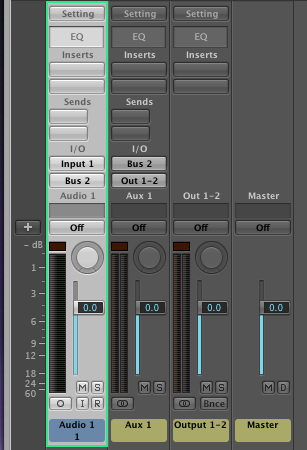
In some situations, it is convenient. In most situations, I don’t really like it. I hope Apple will make this feature switchable on/off in the Preferences (or have a key command to hold down to disable it). Here are some reasons why I find it a little inconvenient:
- For situations where you aren’t using the bus for effects (reverb, delay, etc), you don’t need that extra Aux track
- When you are summing things (so for example if you are assigning all your drums to Bus 1), the aux track is created on the far right side of the mixer (and you can’t drag it over near your drums). I think this makes the mixer a little disorganized at times, especially when you have a lot of groups to sum and a lot of effects.
- If you are using the bus to route to an audio track, you need to either mute or disable the output of the “automatically-created-aux-track” (explained below)
If I want to sum audio through the use of a bus (maybe to “record” your mix at the end of the day), normally you would just output all of your tracks to a bus, and create an audio track with that input, and hit record. In Logic, since the audio will also be going to the Aux track that was automatically created, you need to stop the Aux from playing (or else the audio will be playing twice through your master bus, once from the audio track and once from the aux track, and this could distort your master output, hurt your speakers/ears…etc). You can just mute the aux track, but I would suggest going one step further. Assign the output of the Aux track to “No Output”. In the first picture below, you will see the audio playing both through the audio track (labeled “PRINT”) and the aux track (labeled “AUX IN”). In the second picture, I assign the output to “No Output”.
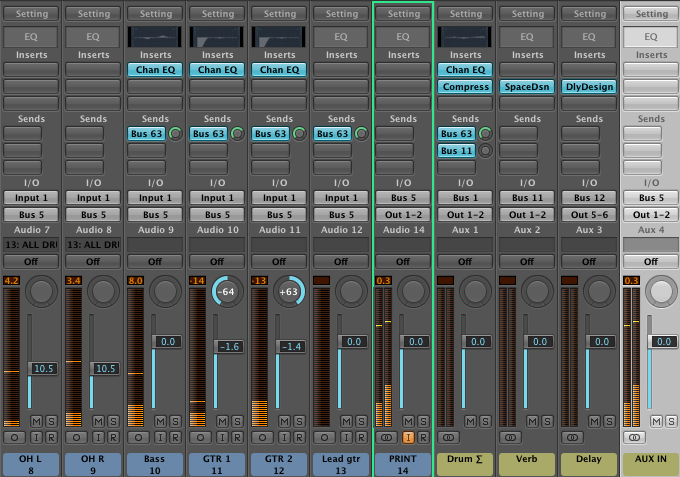
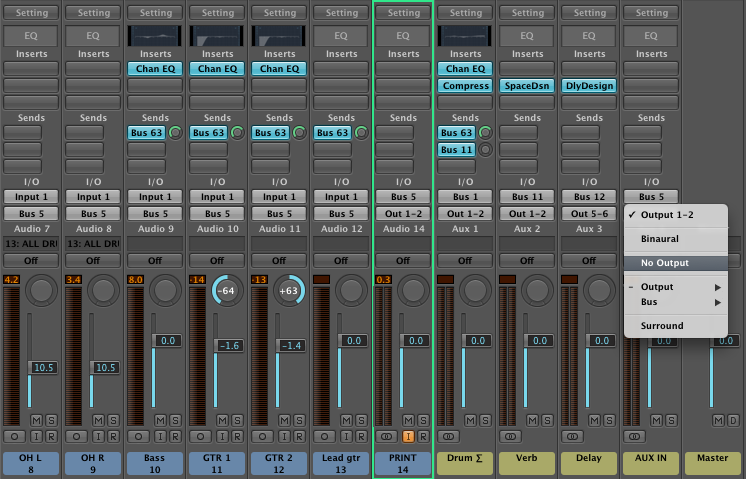
This technique will be important if you want to sum your mix “in the box” and print your mixes to a stereo track within your project file. (That will be the subject of a video and article coming up very soon). If you have any questions about bussing and auxes, post in the comments here or send me an email. I hope anyone who is switching from Pro Tools LE to Logic Studio is finding these articles somewhat helpful. Please let me know if there is a specific topic you’d like me to cover or make a video of.
C
The Studio Files
Comments»
Oooh…. at first I thought “WHAT A GREAT IDEA!” but I see upon further review how the auto-aux thing could be annoying. Just for clarification, you’re unable to delete or change the position of the Aux tracks in the mixer? o.O
Please, someone correct me if I am wrong, but I don’t think you can drag aux tracks over from the right side of the mixer. I’m pretty sure they are stuck over there.
As far as getting them out of your mixer, I just go into the environment and delete them out of the Mixer window.
Honestly, the auxes and bussing are tedious IMHO. So far, its really the only thing I haven’t liked about Logic. Its a great program, so I can live with it
I’m a little late in finding your articles on Logic for ProTools users, but I just wanted to say I really appreciated you writing them; I read through all of them in one sitting. I’m a recovering ProTools HD user who’s looking to start his own home studio. And for obvious reason PT HD is out of the question. And with Logic’s recent price drop and feature additions, it’s really become a rather attractive alternative to PT. But as an audio-only guy (for the most part) I worried about Logic’s audio editing vs. ProTool’s. Your articles have really cleared a lot of things up for me and have helped me decide to go ahead with Logic and treat it as its own beast.
Thanks again. You’re site has definitely earned a place in RSS reader.
Thanks, Joey,
We’re certainly glad to hear that. Be sure to check out the video tutorials that Connor has been posting on YouTube: (http://www.youtube.com/user/studiofiles)
Lots of techniques approached from both platforms.
Damon
The Studio Files
“Please, someone correct me if I am wrong, but I don’t think you can drag aux tracks over from the right side of the mixer. I’m pretty sure they are stuck over there.”
Forgive the incredibly late addition to this discussion, but there is a workaround I use for this which is something of a PITA but gets the job done. If you create a new track in the arrange page, and then reassign its output to the Aux that you wish to move, you will be able to move that track around in the arrange page, and the Aux will follow suit in the mixer. If you wish, you can then go ahead and hide the arrange track to keep it out of the way. Disclaimer: I’m doing this from Logic 9 so can’t fully confirm it works in 8.
Hope this helps
You actually can move your aux tracks around in Logic. All you have to do is right click on the aux track in the Mixer window, then click “Create/Select Arrange Track”. This will place the aux track in the Arrange window allowing you to place it wherever you want just like it was another track in your session. You can only move it around in the Arrange window, so make sure to keep that in mind.
If you are needing to delete extra aux tracks from your session, first make sure you delete them from the Arrange window if you have done what I explained above (Track-Delete Track). Once they are removed from the Arrange window, just go back to your Mixer window and highlight the aux track you wish to remove then hit the “Delete” key on your keyboard.
Enjoy!
Also, when you assign outputs of multiple tracks to “Bus 1″ for example, they don’t play through your master twice as stated above. Rather, they are routed through the bus first and the output of the bus (if it is assigned to the master) then goes to the master. If you are routing audio to an aux track via a bus using the aux sends on each mixer string AND routing each track to the master at the bottom of each track, then you’ll potentially double the signal. I often use the first scenario to sum tracks to one fader so I can easily add effects to multiple items and control them in the mix. All relative panning and volume control of the individual summed tracks is retained .
how many plugins can go on a bus? and also how many tracks can be assigned to one bus? using pro tools